First-run without a domain
The terminal-to-web bootstrap when only a VPS and an IP are available — no DNS, no Cloudflare. Reach the panel by IP first, become a DNS provider from inside the panel, then cut over to a real hostname with automatic TLS.
The standard install assumes a domain is already pointed at the box. This
page is for the other case: a VPS (an IP, plus SSH) and a domain at a registrar, but no DNS
provider to keep — no Cloudflare anywhere. By the end the panel runs at
https://panel.example.com/ with a real certificate, and example.com is answered by
self-hosted PowerDNS nameservers, managed from inside the panel.
There is a deliberate ordering here because of one circular fact: panel.example.com needs to be
served by the new PowerDNS, but PowerDNS doesn't exist until it's set up in the panel, and the
panel can't be opened by hostname until DNS resolves. The way out is to reach the panel by IP
first, build DNS from there, and switch to the hostname last.
One principle carries the whole arc: agents and browsers use different addresses. Node agents dial the panel box's stable public IP — permanently, before and after the cutover. The hostname is for humans and certificates only. This is what makes the cutover a non-event for the fleet: nothing an agent depends on ever changes. (The alternative — baking the hostname into agents — means any later panel rename strands every agent on a dead address, and a hardened node has no SSH to fix it over. The sharp-edges section below records that failure live.)
1. Install on the VPS, reach the panel by IP        (no DNS at all)
2. Create the admin account                         (over https://<ip>/)
3. Generate the recovery kit + enroll 2FA           (BEFORE the first node — see below)
4. Point agents at the IP                           (WORKER_WSS_URL=wss://<ip>/ws in .env)
5. Enroll a PowerDNS box as a nameserver node       (in the panel UI)
6. Create the example.com zone + records            (in the panel UI)
7. Set glue + NS for example.com                    (at the registrar — the one unavoidable step)
8. Cut the BROWSER side over to panel.example.com   (edit .env, restart — agents unaffected)
9. Enroll the rest of the fleet (site/app nodes)
Pausing after step 2 is fine for as long as needed — the panel is fully usable over its IP. Steps 5–8 are the "become a DNS provider" part, and the Self-hosted DNS section covers each in depth.
Before starting
- A Linux VPS (Ubuntu/Debian) with root/sudo, its public IP, and SSH (key or password).
- The image must be reachable: the public default
ghcr.io/spipov/spipcp, or a custom registry. - A domain at a registrar whose control panel allows (a) editing DNS records for the zone and (b) setting the nameservers + glue for the domain. (Nearly all do — that's all that's needed from them; DNS isn't staying there long-term.)
- A second small VPS for the first nameserver (
ns1). A third forns2is strongly recommended — most registrars require at least two nameservers to delegate.
Generate the secrets once (keep them safe — they're permanent)
On the laptop or the box:
openssl rand -hex 32   # BETTER_AUTH_SECRET
openssl rand -hex 32   # AGENT_GATEWAY_SECRET
openssl rand -hex 32   # MASTER_KEY        (field-encryption key — never rotate casually)
openssl rand -hex 24   # POSTGRES_PASSWORD
MASTER_KEY is permanent
MASTER_KEY encrypts every secret the panel stores — SSH creds, PowerDNS API keys, certs. Losing
it means losing access to those secrets. Store it in a password manager and in the
recovery kit, generated in the
setup wizard.
Install on the VPS, reachable by IP (no DNS yet)
SSH in and run the installer. The key choice at this stage: SITE_ADDRESS = the VPS IP and
TLS_MODE=internal, so Caddy serves a self-signed cert and the panel answers on the raw IP
with no DNS anywhere.
ssh root@<vps-ip>

curl -fsSL https://<your-git-host>/SpipCP/spipcp/raw/branch/main/install.sh -o install.sh
chmod +x install.sh

SITE_ADDRESS=<vps-ip> \
TLS_MODE=internal \
BETTER_AUTH_SECRET=<paste> \
AGENT_GATEWAY_SECRET=<paste> \
MASTER_KEY=<paste> \
POSTGRES_PASSWORD=<paste> \
SPIPCP_TAG=latest \
./install.sh --repo https://<your-git-host>/SpipCP/spipcp.git --yes
The installer provisions Docker if missing, validates the .env (it refuses to start
half-configured), pulls the image, and brings the stack up. When it finishes:
docker compose ps                       # everything healthy
curl -fsSk https://<vps-ip>/healthz     # -k because the cert is self-signed
Why IP and not the hostname yet?
Nothing authoritative for the domain is publishing the panel hostname yet, and a real Let's Encrypt cert needs the hostname to resolve. Internal TLS on the IP sidesteps both, allowing immediate access.
Open the web UI and create the admin
Browse to https://<vps-ip>/. The browser will warn that the certificate isn't trusted (it's
Caddy's internal CA) — accept it once and continue. The first account created becomes the
admin, and it's pre-verified, so access is available even before email is configured. Set up 2FA
at this point.
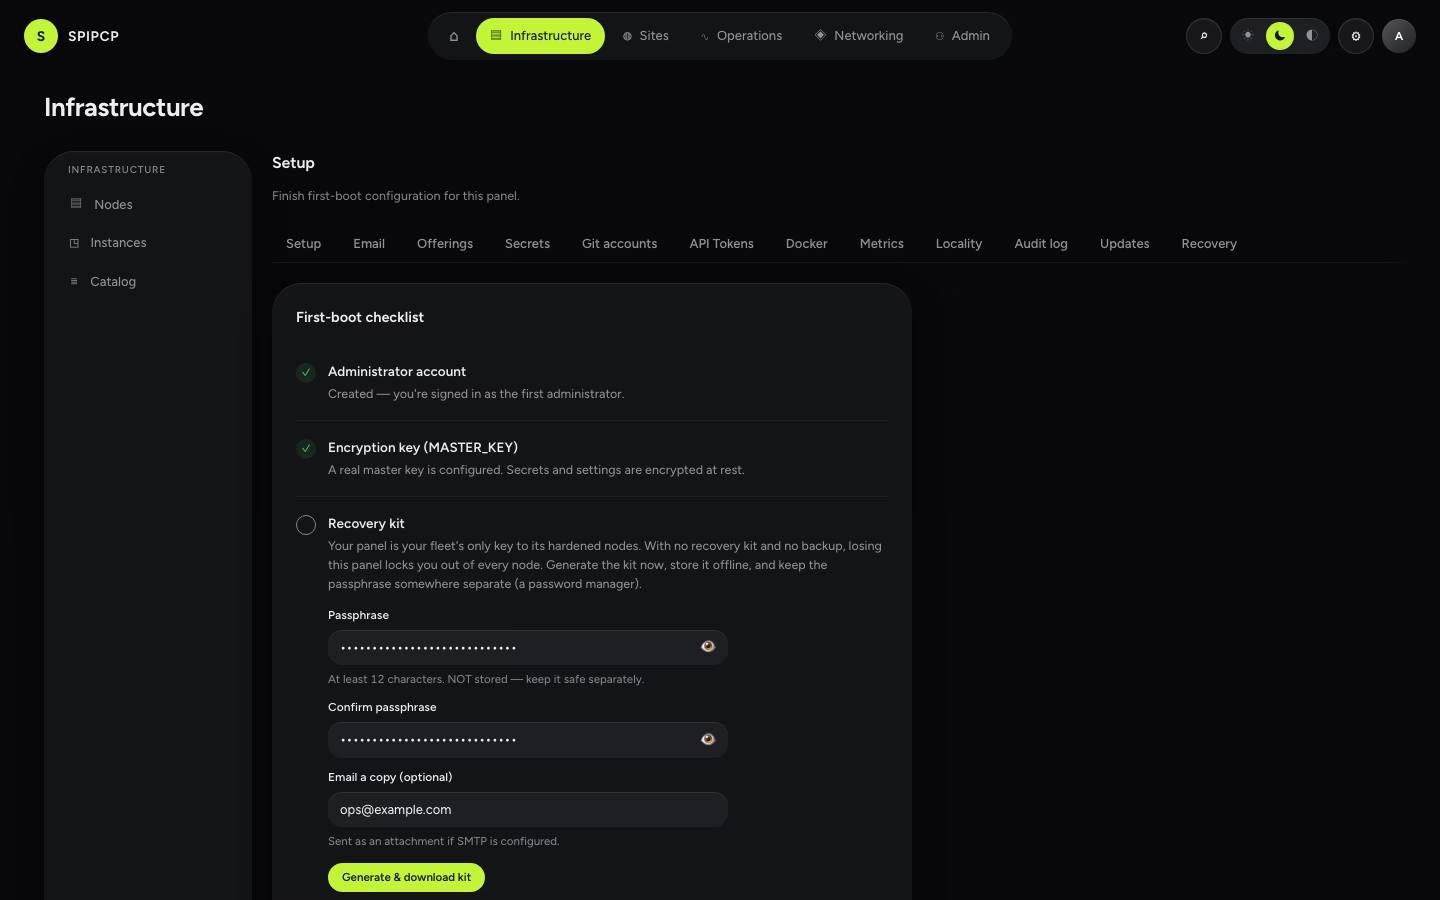
That's the terminal-to-web handoff: from here on everything is done in the UI.
Generate the recovery kit BEFORE the first node
Enrollment hardens every node — password and root SSH are turned off, and from then on the panel is the only key to the box. The recovery kit (and 2FA) must therefore exist before the first node does, not after: with the kit stored out-of-band, even a lost panel can re-pair its hardened fleet. The Dashboard shows both as red alerts until they're done.
Point agents at the stable IP
Before enrolling anything, set the agents' dial-home address in /opt/spipcp/.env to the panel
box's public IP — the address that never changes:
WORKER_WSS_URL=wss://<vps-ip>/ws       # the agents' permanent dial-home
AGENT_BINARY_URL=https://<vps-ip>      # where nodes fetch the agent binary
then cd /opt/spipcp && docker compose up -d. Every agent enrolled from now on dials this IP —
through the bootstrap, through the hostname cutover, and through any future rename. Enrollment
detects that the gateway serves a self-signed certificate (an IP has no public-CA cert) and
configures the agent for it automatically; the agent binary is signature-pinned end-to-end
regardless of transport. As a backstop, the panel announces its current worker URL to every
connected agent, which adopts and persists it — so even a deliberate gateway move heals itself.
Stand up the first nameserver (PowerDNS) as a node
DNS is managed under the Networking section (Domains · Providers · Nameservers · Edge proxy · SSL).
- Networking → Domains (empty until a hostname is attached) and pick the Self-hosted nameservers posture — maximum data ownership, every record held in-house.
- Networking → Nameservers → Add nameserver — ONE wizard does everything: enter
ns1's host/IP, SSH port, user, and paste the SSH key or password the provider issued. The panel SSHes in once, installs and hardens the agent, then installs PowerDNS and generates the PowerDNS API key itself — it's never typed or seen manually; it's encrypted at rest. The box also appears under Nodes afterwards (a nameserver IS a node; the pages cross-link). From then on it never needs SSH again — the agent dials home over its own authenticated WebSocket. - Repeat for
ns2on the second box (two are needed for delegation).
The agent binary the wizard installs is baked into the panel image and auto-published, signed — there is no "publish a release" step; the first enrollment just works. The boxes' provider firewall (if any) must allow inbound 53/udp + 53/tcp — they're about to be public authoritative nameservers.
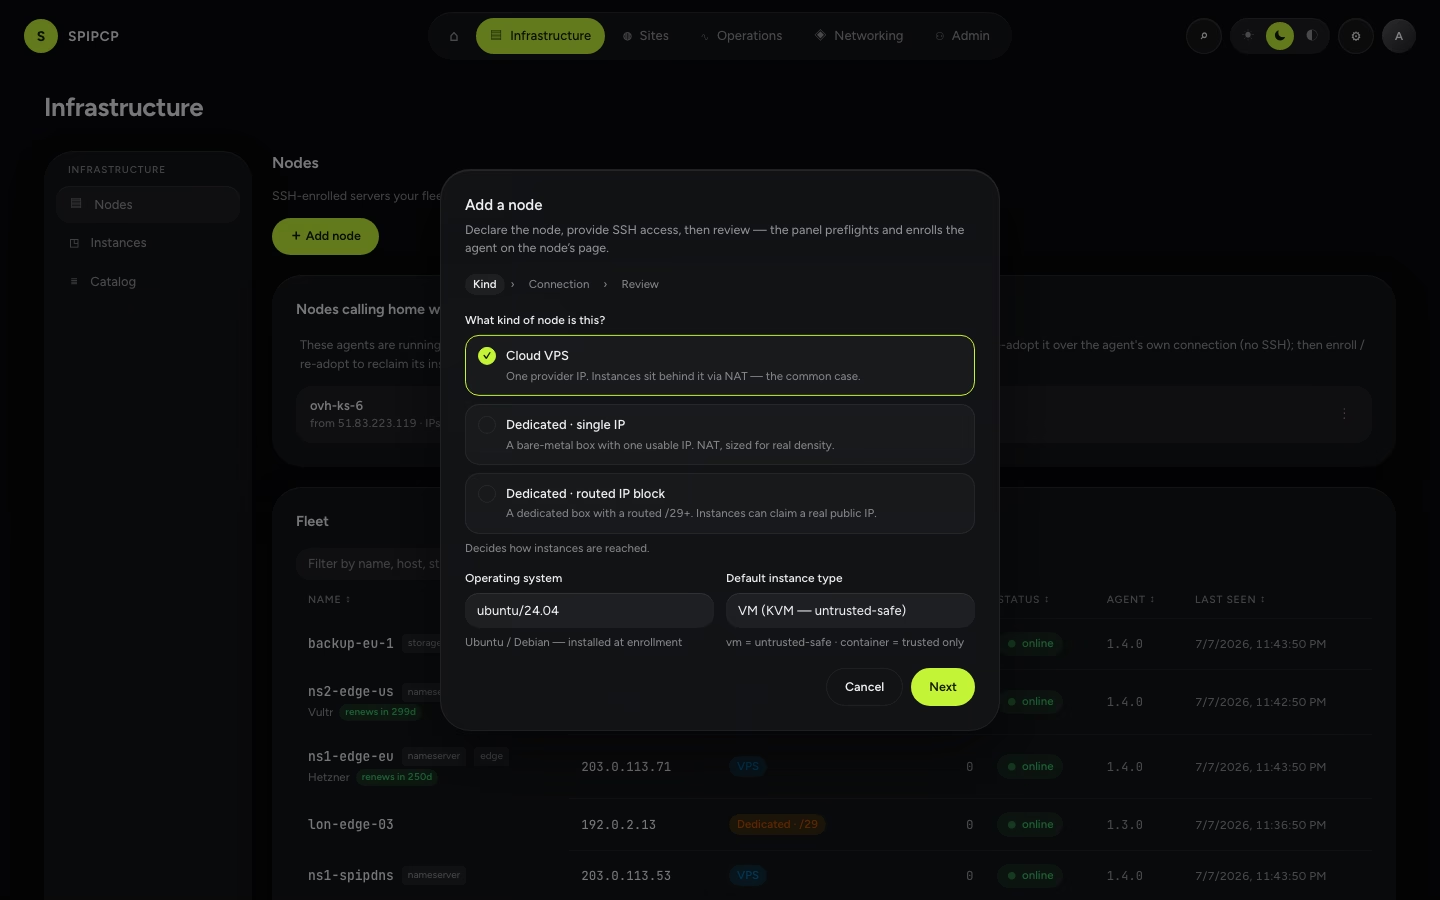
→ Nodes · Self-hosted DNS
Create the zone and its records
In Networking → Nameservers, create the zone for the domain (served by the new PowerDNS boxes), then add:
| Record | Type | Value | Why |
|---|---|---|---|
panel.example.com | A | <panel vps-ip> | the panel's permanent hostname |
ns1.example.com | A | <ns1 ip> | the first nameserver |
ns2.example.com | A | <ns2 ip> | the second nameserver |
example.com (apex) | A | as needed | the bare domain, optional |
Replace example.com with the actual domain throughout. The apex SOA/NS are panel-managed
and locked so delegation can't be accidentally broken. Wildcards (*.example.com) are supported
for customer sites later.
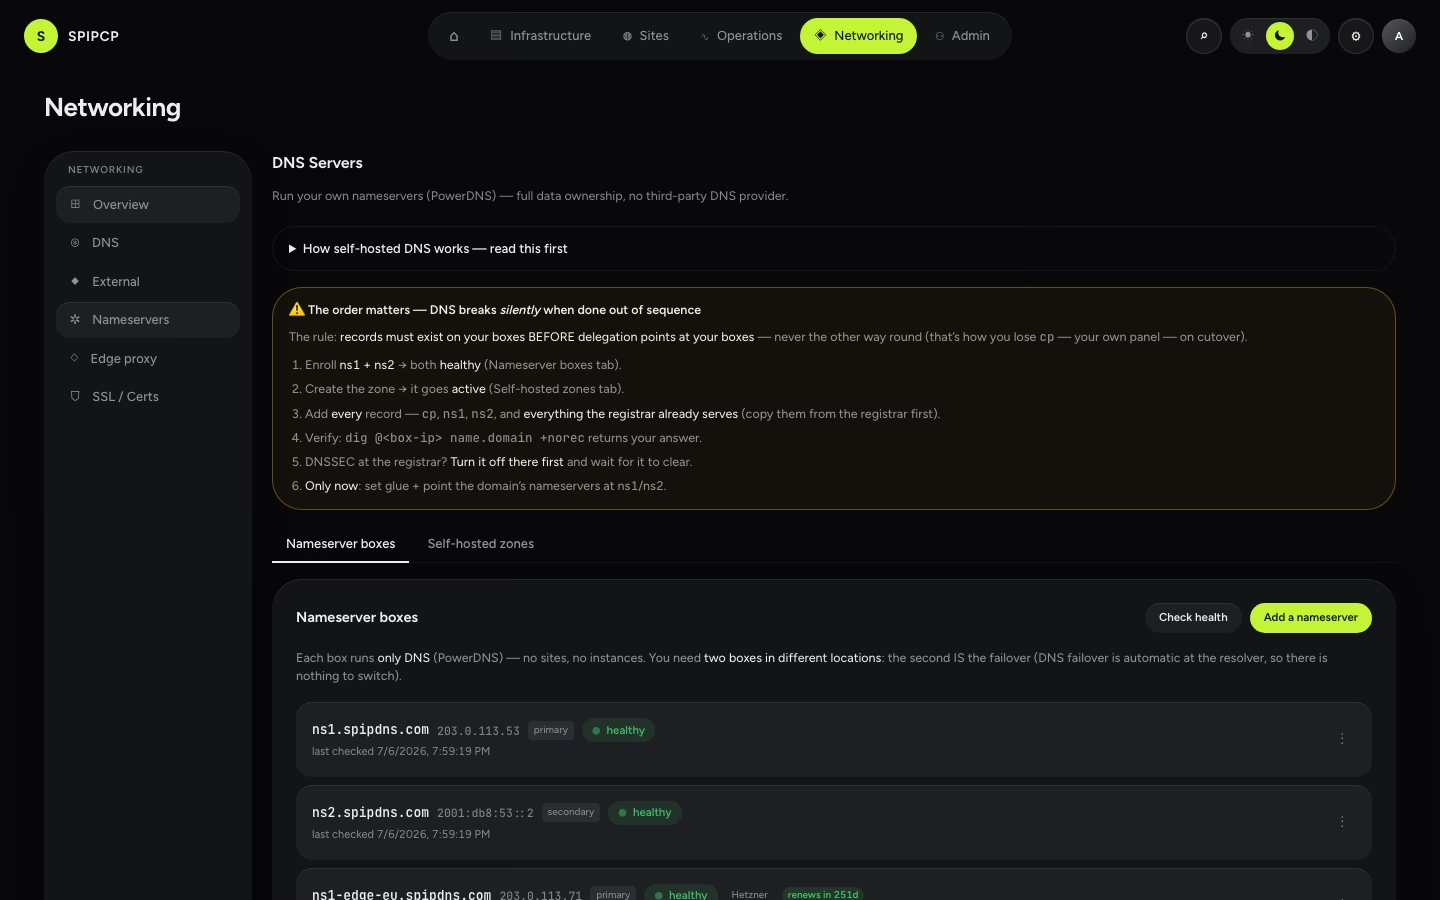
At this point the PowerDNS boxes can answer for the domain — but the world still asks the registrar, because the registrar hasn't been told to point at the new boxes yet. That's the next, and only, registrar step.
Point the domain at the nameservers (at the registrar)
This is the one thing the panel cannot do, by design: the registrar always owns the domain's delegation. In the registrar control panel for the domain:
- Add glue records (a.k.a. "register host" / "private nameservers"): tell the registry that
ns1.example.com=<ns1 ip>andns2.example.com=<ns2 ip>. Glue is required because the nameservers live inside the domain they serve — without it resolvers can't find them. - Set the nameservers for the domain to
ns1.example.comandns2.example.com, replacing whatever is there now. This is the "take over from Cloudflare" moment.
Delegation propagates over minutes to a couple of hours. Verify:
dig +trace NS example.com                # should end at ns1/ns2.example.com
dig @ns1.example.com panel.example.com A # the box answers with the panel IP
Because the panel hostname (and everything else) was recreated in PowerDNS in the previous step, the cutover is seamless — both sides serve the same records.
No lock-out risk
The panel hostname being served by the very PowerDNS the panel manages is safe. PowerDNS answers queries on its own; the panel only writes records into it. If the panel is ever down, DNS keeps resolving.
Cut the BROWSER side over to the hostname + real TLS
Now that panel.example.com resolves to the panel box, switch the human-facing side off the
IP/self-signed cert and onto the real hostname with automatic Let's Encrypt. One edit, all
together — and note what is not in it: WORKER_WSS_URL stays the IP. Edit
/opt/spipcp/.env on the panel VPS:
SITE_ADDRESS=panel.example.com               # the browser hostname (was the IP)
TLS_MODE=you@example.com                     # real email → real Let's Encrypt cert
BETTER_AUTH_URL=https://panel.example.com    # auth origin must match the public host
PANEL_IP=<vps-ip>                            # the stable agent gateway — set in this SAME edit
# WORKER_WSS_URL stays wss://<vps-ip>/ws     # agents are NOT part of a cutover
Restart the stack:
cd /opt/spipcp
docker compose up -d
curl -fsS https://panel.example.com/healthz   # no -k now — the cert is real
The panel is live at https://panel.example.com/ (Caddy obtained the cert over ACME HTTP-01
the moment the hostname resolved), and every node stays online through the switch — the
agents' address didn't change. Caddy now serves two sites: the hostname for browsers, and the
PANEL_IP gateway (/ws only, self-signed) for agents; a browser hitting the bare IP is
redirected to the hostname.
Agents never follow the hostname
The two addresses must not be conflated. SITE_ADDRESS/BETTER_AUTH_URL are free to change
again later — a rebrand, a new domain — with a matching docker compose up -d and nothing
else. Pointing WORKER_WSS_URL at the hostname instead ties every agent to that name: renaming
the panel then strands the whole fleet on a dead address, and a hardened node (SSH off, by
design) offers no second door. PANEL_IP must differ from SITE_ADDRESS; while
SITE_ADDRESS is the IP (before this step), PANEL_IP stays unset.
From here
- Add the rest of the fleet — Nodes → Add node for each app/site box, then deploy sites with domains, SSL, databases, and backups.
- Issue customer domains — with these nameservers authoritative, any record can now be written and certs issued (including wildcards via DNS-01) for any site, straight from the panel. → Domains & SSL
- Arm recovery — generate the recovery kit so the boot secrets exist out-of-band before any backup is taken. → Disaster recovery
- Day-2 ops & upgrades — pin
SPIPCP_TAGto a release (notlatest) and update on a fixed schedule. → Updating the panel
Quick reference: the env vars that change between stages
| Variable | IP bootstrap | After the cutover |
|---|---|---|
SITE_ADDRESS | <vps-ip> | panel.example.com |
TLS_MODE | internal | you@example.com |
BETTER_AUTH_URL | https://<vps-ip> | https://panel.example.com |
WORKER_WSS_URL | wss://<vps-ip>/ws | unchanged — the stable agent gateway |
AGENT_BINARY_URL | https://<vps-ip> | https://panel.example.com (or leave the IP) |
PANEL_IP | unset (SITE_ADDRESS is the IP) | <vps-ip> — set in the same edit as the hostname |
BETTER_AUTH_SECRET / AGENT_GATEWAY_SECRET / MASTER_KEY / POSTGRES_PASSWORD | set once, stable forever | (unchanged) |
See the full .env reference for every variable.
Sharp edges — each one hit during a live bootstrap
The ordering above is not a style choice; every rule in it earned its place:
- A reimaged box has a new SSH host key. The next
sshprintsREMOTE HOST IDENTIFICATION HAS CHANGED— after a deliberate reimage that is expected, not an attack. Clear the stale key and reconnect:ssh-keygen -R <ip>. - Agents verify TLS strictly by default. An agent pointed at a self-signed gateway without
enrollment's automatic accommodation loops forever on
x509: certificate signed by unknown authorityand the node never reports in. Enrollment derives this from the gateway itself (internal TLS, or an IP-literal worker URL) — the agent binary stays signature-pinned either way. - The orphaning trap. With agents pointed at a hostname, changing that hostname strands the
whole fleet dialling a dead address — and SSH re-enrollment cannot reach a hardened node
(password/root SSH are off, by design). Recovery, if hit on an older setup: serve the old
address again (
SITE_ADDRESS/WORKER_WSS_URLback to the IP,TLS_MODE=internal,docker compose up -d) — the agents reconnect within seconds and nothing is lost. The stablePANEL_IPgateway plus the panel-announced worker URL exist so the trap cannot recur. - Switching certificate modes can wedge Caddy — leftover state from the previous mode
surfaces as bare TLS
internal_erroralerts in the browser. The reset is safe and scoped (certificates re-issue; the database and every node are untouched):docker compose down && docker volume rm spipcp_caddy_data spipcp_caddy_config && docker compose up -d. - DNS keeps serving through all of it. PowerDNS answers on its own; the panel only writes
records into it. A node showing
unreachablemeans the management channel is down, never the zone.dig @<ns-ip> example.com SOAis the ground truth about DNS.
Related
- Installation — the standard install when a domain is already pointed at the box.
- DNS: the two layers — delegation vs. records, and the posture chooser.
- Self-hosted DNS — running self-hosted PowerDNS nameservers in depth.
- Setup wizard — admin account,
MASTER_KEY, recovery kit, SMTP.