Delegate a domain
Per owned domain — create the zone in the panel, add records and the wildcard, then change the registrar's nameservers to ns1/ns2.spipdns.com and verify it propagated. Layer 1 made concrete.
With nameservers set up, putting a domain onto them is the
Layer 1 action made concrete: create the zone (Layer 2) in the panel, then change the
domain's nameservers at its registrar (Layer 1) to point at ns1/ns2. Do this once per domain being
self-hosted.
Order matters: records first, then delegate — never the other way round
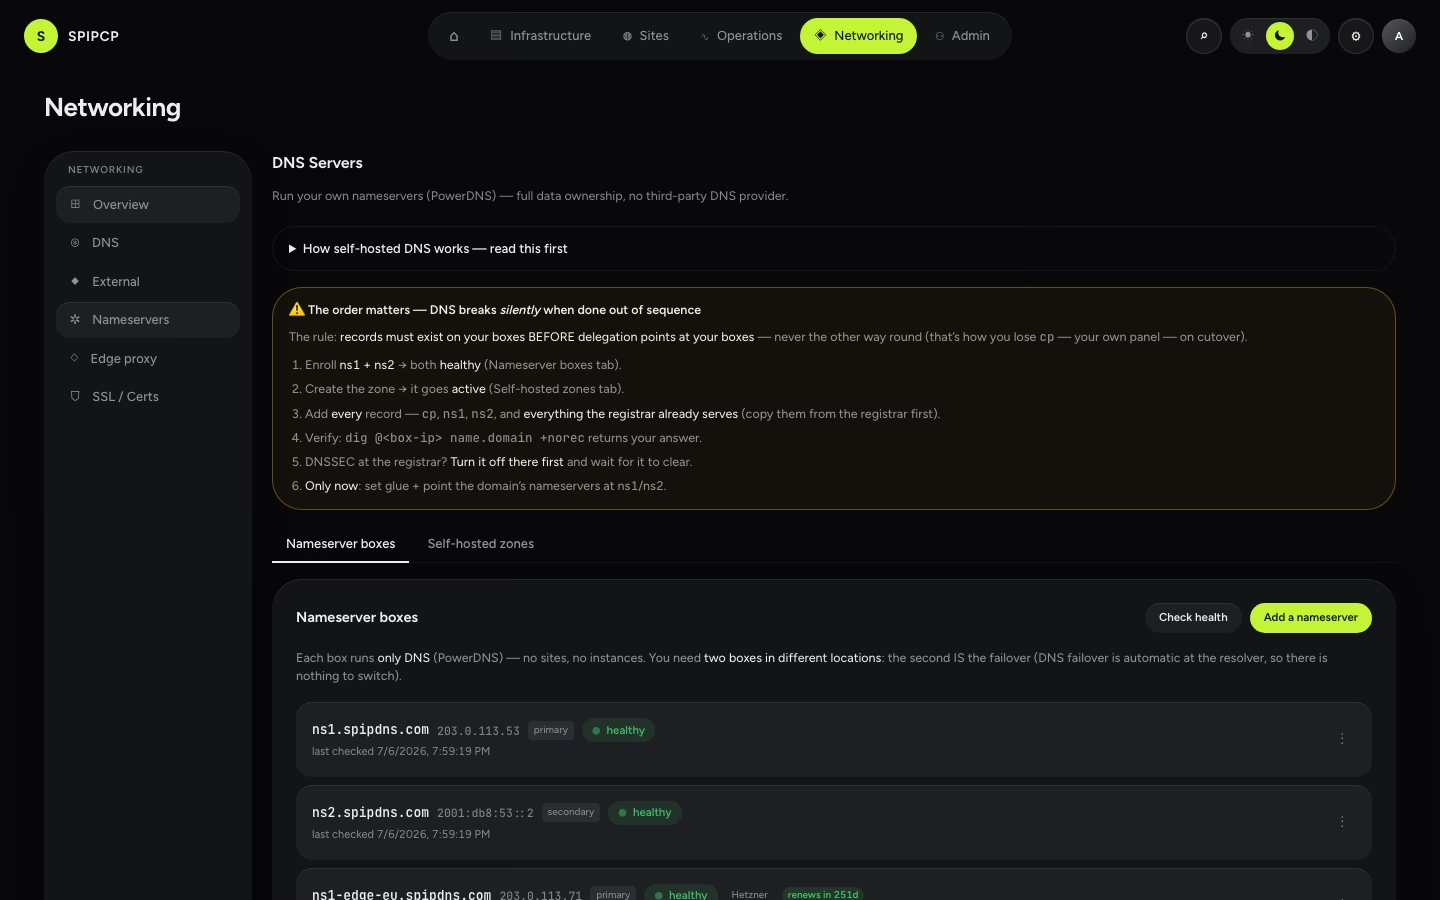
The one rule that governs go-live: records must exist on the boxes BEFORE delegation points at those
boxes. Delegating first means that, hours later, the panel itself at cp.example.com goes dark —
because authority moved to boxes that never had the cp record. Copy the registrar's existing
records into the zone first (apex A/AAAA, www, mail MX/SPF/TXT, ftp, and anything else it
already serves), so the instant authority moves to the new boxes they already have every answer. The
DNS Servers page keeps this order visible as an always-visible callout above the tabs. The full
sequence:
- Enroll
ns1+ns2until both are healthy (the Nameserver boxes tab). - Create the zone so it goes active (the Self-hosted zones tab).
- Add every record —
cp,ns1,ns2, and everything the registrar already serves (copy them from the registrar first; Paste many does this in bulk). - Verify:
dig @<box-ip> name.example.com +norecreturns the expected answer. - DNSSEC at the registrar? Turn it off there first and wait for it to clear (see DNSSEC).
- Only now set glue + point the domain's nameservers at
ns1/ns2.
1. Create the zone in the panel
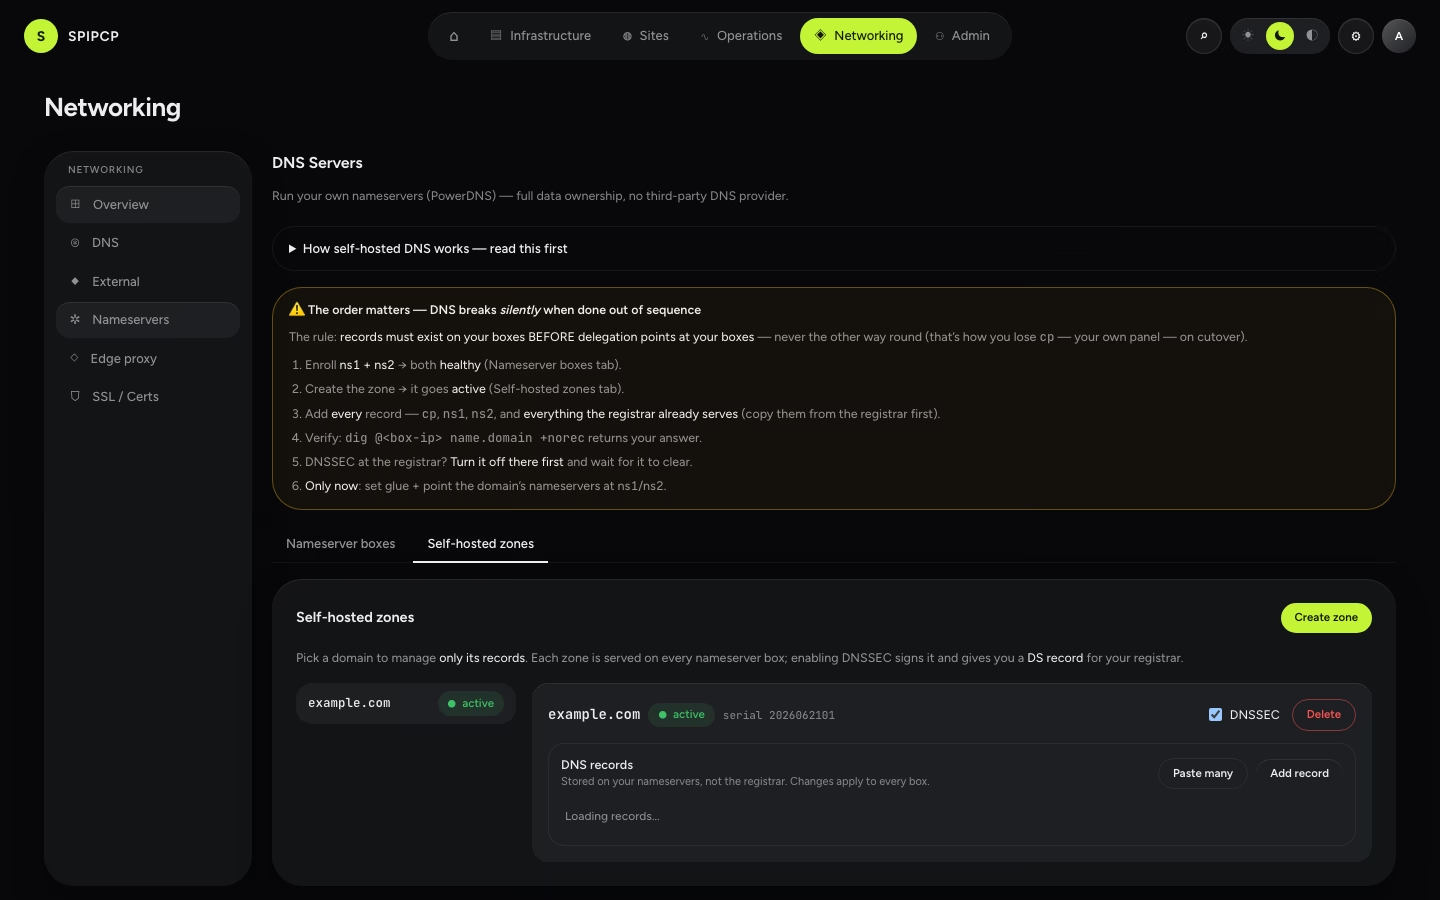
In Networking → Nameservers → Self-hosted zones → Create zone, enter the domain (e.g. example.com).
SpipCP creates the zone and pushes it to each nameserver box separately — so both ns1 and ns2 are
authoritative for it right away (one box being down doesn't block the create; it catches up when it returns).
The Self-hosted zones tab works one domain at a time (the Cloudflare model): a zone selector — a left rail on wide screens, a dropdown on narrow ones — lists the zones, and only the selected zone's records show. The selection persists across visits, landing back on the domain last being edited.
2. Add records (and the wildcard)
Pick the domain in the zone selector and its records show — that's where the domain's answers are managed. These are Layer 2, living inside the now-authoritative boxes:
| Record | Typical use |
|---|---|
| A / AAAA | example.com and subdomains → the node's IP(s). |
| CNAME | An alias (e.g. www → example.com). |
| MX + TXT | Mail routing and SPF / DKIM / DMARC, when mail is run. |
| SRV / CAA | Service discovery; restrict which CAs may issue certs. |
| Wildcard | *.example.com → catch every subdomain at once (use * as the name). |
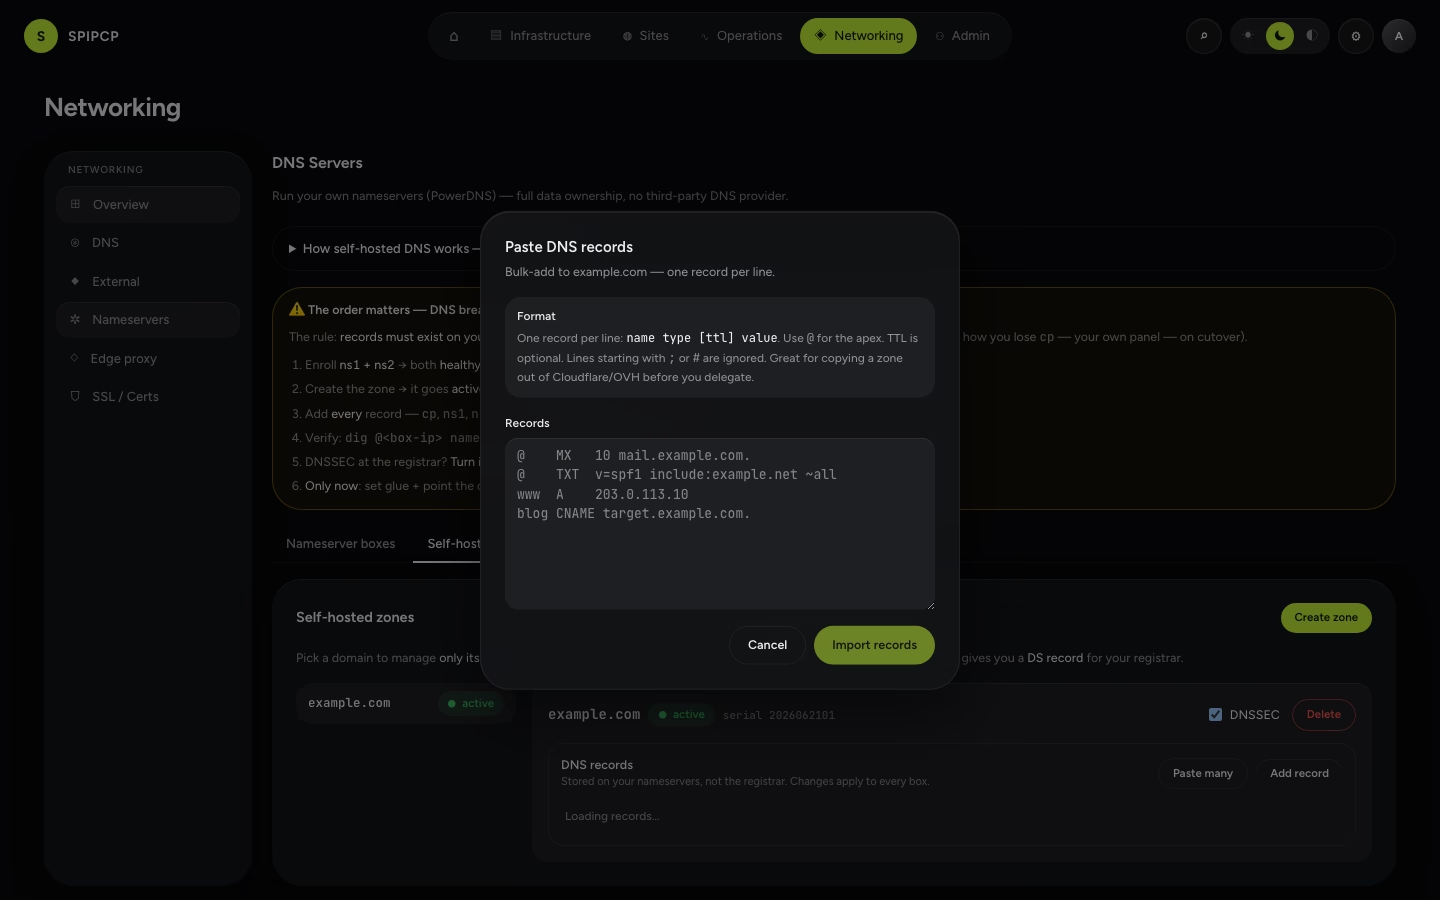
Add record opens a dialog: a name (relative to the zone — www, @ for the apex, * for a
wildcard), a type, one or more values (one per line for round-robin A or multiple MX), and a
TTL (300s is a safe default). Editing a record changes its values and TTL; the name and type are
fixed.
To bring a whole zone across at once, use Paste many — the bulk-import dialog. It's built for exactly the go-live case: copying a zone out of Cloudflare/OVH before delegating. Paste the old provider's export, review, and every record lands in the zone in one go — so the boxes hold the full set of answers before the domain is pointed at them.
Records live in the zone, not at the registrar
This is the part people miss. Once the domain is delegated to the new boxes (step 3), the registrar holds no records — the nameservers do. Every A/MX/TXT lives here, in the zone, and that's the only place to edit them.
The apex SOA and NS records are managed automatically (they define delegation itself) and can't be hand-edited here — that's deliberate, so the editor can't silently break who's authoritative. Every change is written to each box, and the result is shown per box; if a box rejected the write it's shown, never a fake success. What the panel shows is what the boxes will answer.
Verify from a clean vantage — a local network can lie about port 53
Before delegating, confirm the nameservers answer authoritatively from the outside — but do not
trust dig @<box-ip> run from a laptop or office network. Many ISPs and networks transparently
intercept outbound port 53 and answer from their resolver, so the query never reaches the box. The
result looks recursive — the ra flag instead of aa, arbitrary domains resolving, counting-down TTLs
— exactly like "the box is misconfigured / it's an open resolver" when the box is actually fine.
The tell: query a known-good authoritative server (e.g. a big provider's own nameserver) from the
same network. If that also comes back recursive (ra), the network is the interceptor, not the
box. Verify the right way instead:
- From the box itself — use the panel's Terminal (a shell over the agent, no SSH needed):
dig @127.0.0.1 example.eu SOA +norecshould showflags: qr aaplus a SOA line.dig @127.0.0.1 example.com +norecshould returnstatus: REFUSED— proving it's authoritative, not an open resolver.- (
digmay need installing first:apt-get install -y dnsutils.)
- From a neutral external checker — Zonemaster in its "undelegated"
mode: enter the domain plus the nameservers-and-IPs
(
ns1.spipdns.com/203.0.113.1,ns2.spipdns.com/198.51.100.1). It queries from its own infrastructure and confirms authoritative + globally-reachable + not-a-recursor before delegation is touched. This is the correct pre-delegation gate.
Where to find Zonemaster's undelegated mode
Open zonemaster.net → Show options → tick Undelegated test, then add
each nameserver as name/IP (e.g. ns1.spipdns.com/203.0.113.1). Run it, and every module should be
green except a Delegation note that the parent still lists the old nameservers — that clears once
the delegation change below propagates.
3. Point the registrar at the new nameservers
Now the Layer-1 move. At the registrar of example.com (the domain being delegated — not the
nameserver domain), replace its nameservers with:
ns1.spipdns.com
ns2.spipdns.com
This moves the whole zone's authority from wherever it was (e.g. the registrar's default DNS, or a managed provider) to the new boxes. It is not a record edit — it's the "who is authoritative?" answer changing. Remove any old nameservers so only the two new ones remain.
Leave the optional 'associated IP' field blank
Some registrars' "use my own nameservers" form has an optional "associated IP" / glue field next to
each nameserver name. When the nameservers live under a different domain — the recommended pattern
(ns1/ns2.spipdns.com, see setup) — leave that field blank: the glue
already lives at the nameserver domain, so this delegation needs only the names. Only fill an IP if the
registrar genuinely requires in-domain glue (nameservers inside the very domain being delegated). And
don't accept a pre-filled placeholder IP — clear it.
4. Verify it propagated
Back in the panel, use Verify delegation on the zone. SpipCP checks from outside that the domain's
parent now points to ns1/ns2.spipdns.com and that the boxes answer authoritatively for it.
Delegation propagation can take hours
Nameserver changes go through the registry and are cached by resolvers worldwide; full propagation can take anywhere from minutes to a day (bounded by the parent zone's TTL). The zone shows pending until Verify delegation goes green — that's normal. Don't pull the old nameservers' records elsewhere until delegation is confirmed, so resolvers mid-switch still get answers.
Right after delegation, an external checker may still show the old nameservers, and Zonemaster may flag "parent ≠ child" — until the registry publishes the change and resolver caches expire. That's normal propagation, not an error; re-check after the parent TTL passes.
Once delegation verifies, the domain is fully on the new nameservers — every future record edit in the panel takes effect on that infrastructure. To also sign the zone, continue to DNSSEC.
Next steps
- DNSSEC — sign this zone and register its DS at the registrar.
- Failover — how the two nameservers keep the domain resolving.
- Domains & SSL — attach this domain to a site for HTTPS.
Set up nameservers
Step by step — buy a nameserver domain, enroll two cheap VPS in different locations as nameserver nodes, let SpipCP install PowerDNS, then run the one-time glue wizard at the registrar and verify it.
Failover
Why two nameservers give automatic failover with nothing to configure — resolvers try each NS in turn. What the panel's NS-health probe watches, and what to do when a box goes unreachable.