Set up nameservers
Step by step — buy a nameserver domain, enroll two cheap VPS in different locations as nameserver nodes, let SpipCP install PowerDNS, then run the one-time glue wizard at the registrar and verify it.
This is the one-time setup for self-hosted DNS: stand up the two boxes that will answer for the domains. It happens once; after that, domains are simply delegated to them. Everything here lives under Networking → Nameservers in the panel — a page titled DNS Servers with a Nameserver boxes tab and a Self-hosted zones tab, separate from Settings (managed providers) and from the generic Add-Node flow. (The old DNS → DNS Servers link still works.)
Two VPS — ideally on two different providers
Before starting, have two cheap VPS ready, plus one domain to host the nameservers on. The two boxes are the failover pair, so what matters is that they fail independently:
ns1+ns2on a single box — pointless; one reboot takes out all the DNS.- Two boxes, same provider, same region — weak; they can land on the same physical host, and they share the provider's network, power, and account.
- Two boxes, two different providers (and regions) — best. Separate companies means separate hardware, separate upstream networks (ASNs), separate power, and separate control planes, so no single outage, BGP incident, or account suspension can dark both nameservers at once.
SpipCP writes to each box independently (no link between them — see How it works),
so splitting ns1 and ns2 across two providers is the natural setup, not a special case.
VPS specs
A nameserver is light — PowerDNS answers queries and holds a small zone file; it's not a busy web server. The cost driver is two boxes in two locations, not the size of each box. The smallest tier at most providers is plenty to start.
| Resource | Minimum | Recommended | Why |
|---|---|---|---|
| vCPU | 1 | 1–2 | DNSSEC signing and query load are tiny; 1 core serves a small fleet. A 2nd core only helps with many busy zones. |
| RAM | 512 MB | 1 GB | PowerDNS fits in a few hundred MB; 1 GB leaves headroom for the OS, updates, and key ops. |
| Disk | 10 GB | 20 GB SSD | The OS, PowerDNS, and the zone data are small; the room is for logs and updates. SSD keeps signing snappy. |
| Network | 1 public IPv4 (static) | 1 IPv4 + 1 IPv6, static | Each box needs a stable public IP — it's the glue record. IPv6 lets v6-only resolvers reach it directly. |
| Bandwidth | whatever the tier includes | — | A non-issue for DNS. Queries are tiny UDP packets (tens to a few hundred bytes); even a busy fleet uses a sliver of a 1 TB/mo allowance. Not worth paying extra for. |
| OS | Ubuntu 24.04 LTS | Ubuntu 24.04 LTS | What the enroll flow hardens and installs PowerDNS on. |
| Locations | 2 boxes, 2 regions | 2 boxes, 2 providers + 2 regions | See the callout above — separate providers give independent hardware, network, power, and control planes. |
Why so small?
A nameserver does only DNS — SpipCP won't run instances or sites on it — so the sizing is for DNS alone, which is cheap. The typical $4–6/mo "nano"/"micro" tier at Hetzner, Bunny, OVH, Vultr, etc. is enough for each box. The budget is best spent on the second location, not on bigger boxes.
1. Buy a nameserver domain
Register one domain whose only job is to host the nameserver hostnames — for example
spipdns.com. Two hostnames get created under it, ns1.spipdns.com and ns2.spipdns.com, and
every self-hosted domain delegates to that pair.
It can be at any registrar; it doesn't have to be the same one as the domains being served. Keep it cheap and boring — it's plumbing, not a brand.
Some ccTLDs won't register glue — name nameservers under a gTLD
This is why a separate domain is bought for the nameservers rather than naming them inside a domain
being served. Registrars can create glue (host records) for generic TLDs like .com/.net, but some
ccTLDs — .eu (EURid) is the notable one — do not permit registrar-created in-domain glue; the
registrar's glue / "Hosts" screen is simply disabled for them ("feature not supported for this
extension"). So if the domain to be served is a .eu (or similar), the nameservers cannot be
named inside it (ns1.example.eu is a dead end).
Instead, name them under a glue-friendly domain — a .com like spipdns.com — register the
glue once there, then delegate the .eu (and every other) domain to ns1/ns2.spipdns.com with no
glue needed at the served domain. This is the generally-recommended pattern anyway (a dedicated
nameserver domain); the .eu restriction just makes it mandatory. The nameserver domain itself stays on
its own registrar's DNS — only the ns names + glue get added to it, not delegation.
2. Enroll two VPS as nameserver nodes
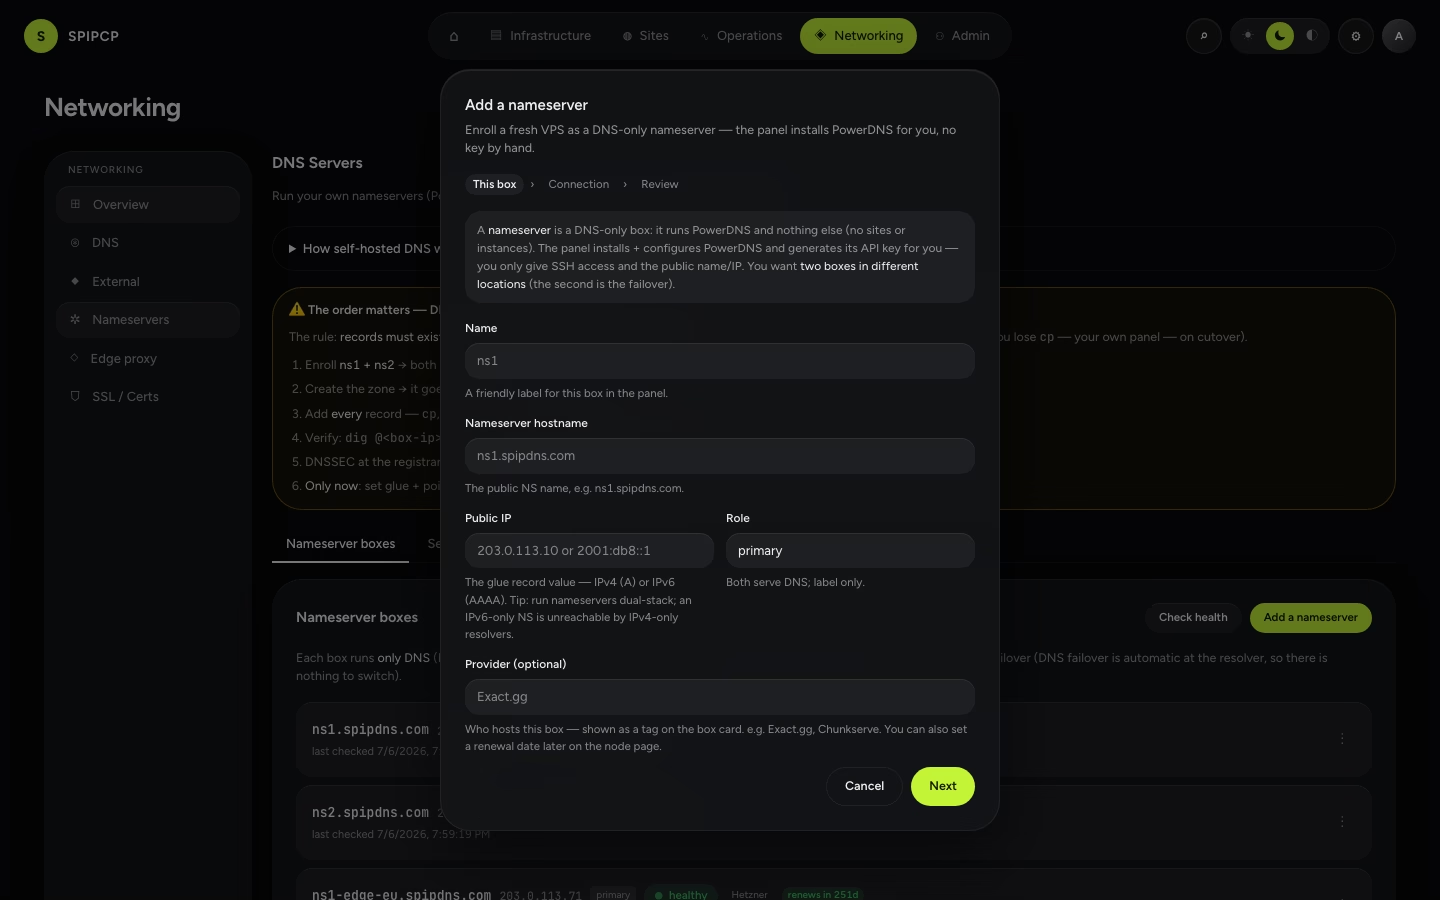
In the panel, go to Networking → Nameservers → Nameserver boxes tab → Add a nameserver. This is its own flow, not the generic Add-Node wizard — a nameserver node is a distinct kind that won't host instances or sites. Run it twice, once per VPS:
For the first VPS (location A), give the flow the SSH connection details (host, user, private key) plus
the nameserver hostname (ns1.spipdns.com) and the box's public address(es). There are two
fields — Public IPv4 and Public IPv6 — and at least one must be filled; enter both if the box is
dual-stack (recommended: it lets IPv6-only and IPv4-only resolvers reach the DNS). No PowerDNS API key needs
typing — the panel generates it. The box can also be tagged with a Provider label (free
text — e.g. Hetzner, OVH) and an expiry date for the box's domain or VPS; both then show on the
nameserver card for an at-a-glance view of where each box lives and when it renews. It enrolls and hardens
like any node, just tagged nameserver. This becomes ns1.
Don't know the box's IPv6 yet? Add it after enroll
If only the IPv4 is available at enroll time, that alone is fine — once the box reports in, the panel reads the
public addresses it actually has and the glue-records card offers a one-click "add" for any family not
set yet (e.g. its reported IPv6). PowerDNS already listens on both 0.0.0.0 and ::, so a box
serves IPv6 the moment its AAAA glue is published.
Repeat for the second VPS in a different location (location B), as ns2.spipdns.com. This becomes
ns2.
The public addresses entered become the glue records at the registrar (step 4) — an A record for each IPv4 and an AAAA record for each IPv6.
3. SpipCP installs PowerDNS
When a nameserver box enrolls, the panel installs PowerDNS on it (the authoritative server plus its API, kept private to the box, with rate-limiting on port 53 to blunt abuse). No manual PowerDNS configuration or API key pasting is needed — the panel generates the key, stores it encrypted, and writes it onto that box during the install. The key never returns to the browser and never leaves the panel except onto its own box.
The PowerDNS API is bound to localhost on the box — it is never exposed to the network. The panel
drives it through the node's agent (the same authenticated agent WebSocket used for everything else),
so the only thing listening publicly is port 53. On a real Ubuntu 24.04 box, systemd-resolved's stub
listener normally holds port 53; the nameserver recipe frees it (it sets DNSStubListener=no and restarts
resolved) before PowerDNS starts, so PowerDNS can bind :53 — the panel handles this automatically, with
nothing to do by hand.
4. The one-time glue wizard
This is the part the panel cannot do automatically — it's Layer 1 at the registrar — so the
panel guides and verifies it instead. "Glue" tells the world the IP addresses of the nameserver
hostnames, breaking the chicken-and-egg where ns1.spipdns.com is itself inside spipdns.com.
The wizard shows exactly what to enter at the registrar of the nameserver domain (spipdns.com).
Each box carries one row per address family — a dual-stack box gets both an A and an AAAA row, and
both get set:
| Register as a "host" / "private nameserver" | Type | Value |
|---|---|---|
ns1.spipdns.com | A | first VPS's IPv4 |
ns1.spipdns.com | AAAA | first VPS's IPv6 |
ns2.spipdns.com | A | second VPS's IPv4 |
ns2.spipdns.com | AAAA | second VPS's IPv6 |
Run nameservers dual-stack
A nameserver reachable only over IPv6 can't be queried by IPv4-only resolvers (and many registrars
require at least one A glue), so an IPv6-only NS set silently fails for some users — the panel warns
when that's the case. The reverse costs nothing but reach: adding AAAA glue lets the growing
population of IPv6-only resolvers reach the DNS directly. Workload boxes can be IPv6-only;
nameservers should be dual-stack. (Set each box's second family in the enroll form, or one-click it
from the glue card once the box reports the address.)
At the nameserver domain's registrar, find "register a host", "private nameservers", or
"glue records" (the name varies). Create each row exactly as the wizard shows it — an A record for
every IPv4 and an AAAA record for every IPv6.
Back in the panel, click Verify glue. SpipCP resolves the two hostnames from outside and confirms they return the right IPs. Glue can take a little while to propagate at the registrar — re-run Verify until it's green.
Glue is registered once, for the nameserver domain only
This happens once, for spipdns.com (the nameserver domain) — not per domain served. After it's
verified, every self-hosted domain just delegates to ns1/ns2.spipdns.com
(delegate a domain) with no further glue work.
5. The NS-health dashboard
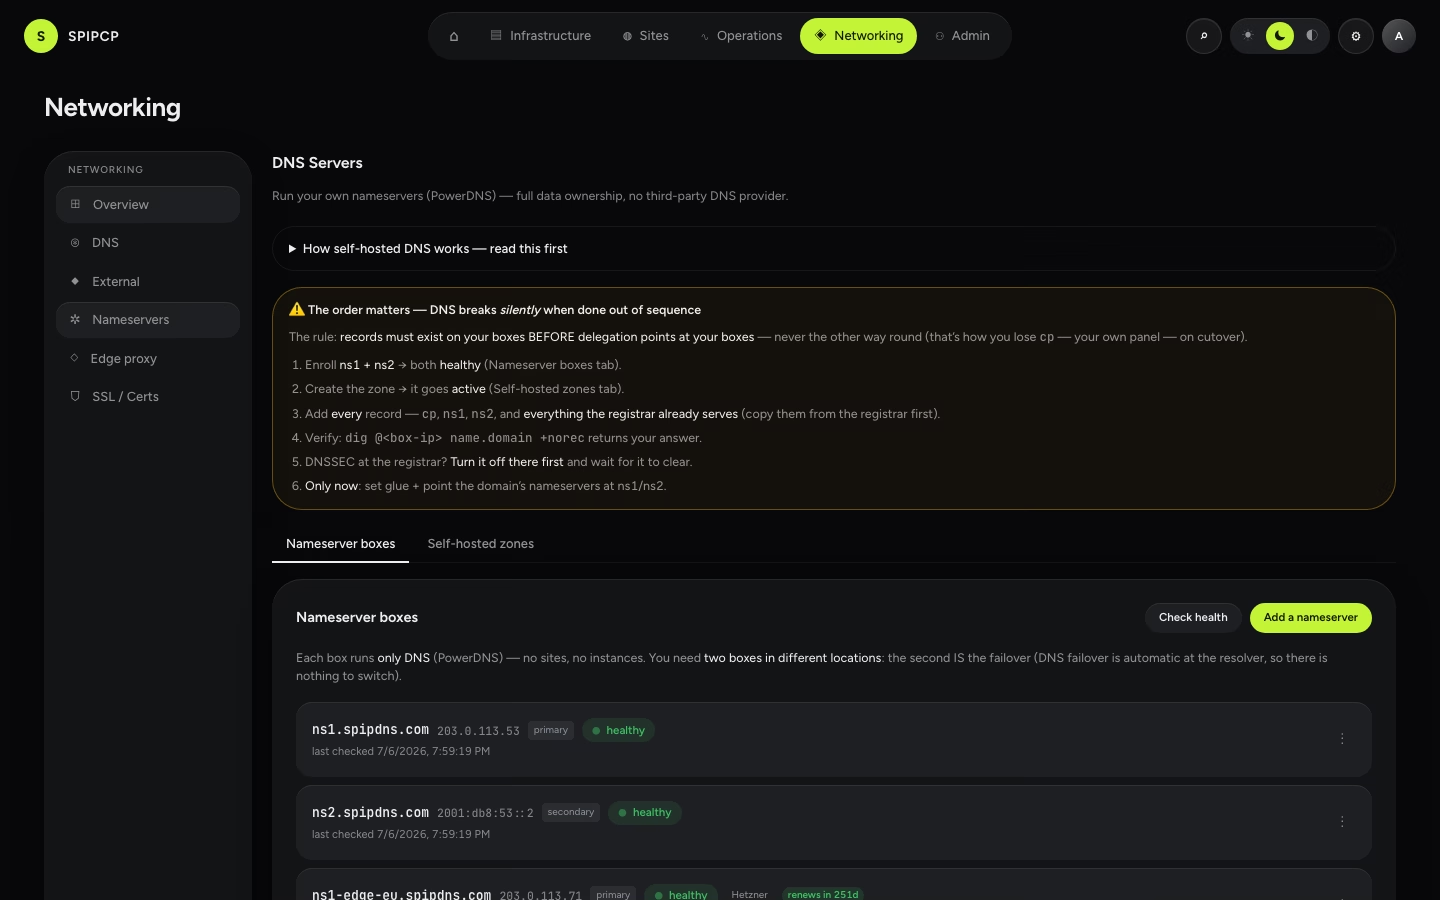
The Nameserver boxes tab under Networking → Nameservers lists the nameserver boxes with a live health check for each: whether the box is reachable, whether PowerDNS is answering on port 53, and whether its glue verifies. Each card also shows the box's provider label and expiry badge. A green pair means the setup is ready to serve zones; an unreachable box shows here so it can be fixed before the second one also fails.
Next steps
- Delegate a domain — put the first real domain on the nameservers.
- Failover — what the two boxes buy and what the dashboard watches.
- DNSSEC — sign the zones.
Run dedicated nameservers
Own DNS end to end by running PowerDNS on cheap VPS as nameserver nodes. The trade-offs (two boxes, the upkeep, no anycast), how it works, and why it's worth it for data ownership.
Delegate a domain
Per owned domain — create the zone in the panel, add records and the wildcard, then change the registrar's nameservers to ns1/ns2.spipdns.com and verify it propagated. Layer 1 made concrete.